While wiring is essential in your boat to transmit power to electronics, navigation lights, bilge pumps and numerous other 12V powered devices, it can also provide a lot of headaches when it fails.
Being out on the water a long way from port and having the sounder shut down just as you are homing in on your favourite patch of ground for the early morning snapper bite is extremely frustrating. Going out without navigation lights working is not only illegal, but also dangerous. A bilge pump will not work without power, and this could be extremely hazardous if you copped a wave when crossing a bar. While all these can be fixed in the long term, the immediate inconvenience or danger is best avoided.
Wiring is essential to provide power from the 12V battery to many devices on your boat. There are often numerous connections required to join all this together throughout the length of the boat and the switch panels. When the wiring is initially installed, either by boat shop mechanics or home handymen, it will be completed to a standard to work at the time it is done. However, it can lack the durability to withstand bouncing and jarring, or the effects of salt water, therefore connections will often fail down the track, usually at the most inconvenient time. Either the connection will come loose and break the electrical circuit, or water corrodes the join.
There are pre-made waterproof connectors available at chandlery shops in a couple of sizes and these are great for the task. At a couple of dollars each though, it can get a little expensive when doing a larger job like completely rewiring a boat. When fitting out my last boat over a decade ago, I ran out of these connectors and made up my own version to finish a wiring job late one night before a trip.
A few weeks ago I had to replace a smashed navigational light and noticed my handiwork, which was still as good as the day I did it, so I’ve decided to share it with you. I have used this system several times over the last decade when fitting new sounders and bilge pumps, and none of these have ever failed due to bad connections. Each connection is waterproof, strong and fairly low profile, ideal for tucking away into tight spaces. Many serious anglers will already have most of the tools and pieces to make these connectors on hand, especially if you are into game fishing.
MacdTech0115_1
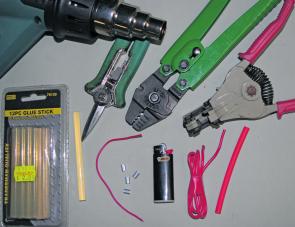
For this project you require some hot melt glue sticks, aluminium monofilament crimps (probably 1.3mm-1.5mm) and some 5mm heat shrink (black and red if you want to match it to your negative and positive wires). Tools that will make the task easier are a wire stripper, swaging tool, cigarette lighter (or other flame), wire cutters and a paint stripper gun. You can do it without these tools, but they make it a lot easier and quicker.
MacdTech0115_2
A wire stripper gun is around $10 from Bunnings and makes removing the plastic coating off an array of wire sizes a lot easier. It you don’t have one, then you could use a box-cutter blade, knife, scissors, or sidecutters to remove the coating.
MacdTech0115_3
Position the wire in the appropriate slot in the wire stripper, with around 5mm protruding past the blades. Squeeze the handle and it will remove the plastic outer coating. Do the same with the other section of wiring that you want to join.
MacdTech0115_4
Cut a section of heat shrink around 2cm long and slide this over 1 wire and up out of the way. Your 2 pieces of wire will go inside the oval crimp, 1 from each side.
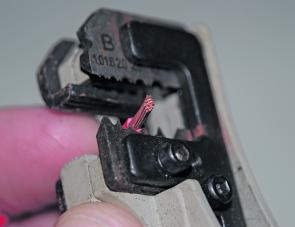
MacdTech0115_5
Put the wire inside the crimp with 1 on each side as shown. It doesn’t matter if the wires are of different types or sizes — this connection will still work well without the need for soldering.
MacdTech0115_6
Place a crimp in the appropriate slot in the swaging tool as shown, so the pressure will be applied from the wide side of the oval crimp and the 2 wires are crushed together. You may need to move the crimp into the next smallest slot and give it another squeeze to make it totally secure. You could use a good electrical wire crimper or even try crushing the crimp with a pair of pliers if you don’t have a swaging tool.
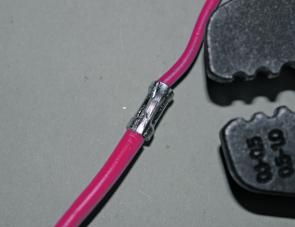
MacdTech0115_7
Crimp the entire length of the aluminium crimp to provide the best connection between the 2 wires. If your new light, sounder, bilge pump or other device is now hard wired to the battery, you can test your connection before going further, however, I have never had one that wasn’t working once secured with my swaging tool.
MacdTech0115_8
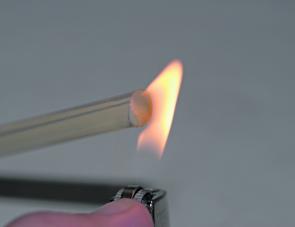
Using a cigarette lighter or other flame, soften the end of the hot melt glue stick. These glue sticks are only a couple of dollars for 10 or more from a craft or hardware shop and you can do a heap of connections with one stick.
MacdTech0115_9
Coat the entire connection with the hot melt glue. If need be, wet your fingers to avoid the molten glue sticking and shape the glue around the connection.
MacdTech0115_10
Slide the heat shrink back down the wire so it covers the entire connection. Use the paint stripper gun or a good hair dryer to make the heat shrink contract. You could also use a naked flame (such as the lighter), but don’t hold the flame directly on the heat shrink. Just pass the heat shrink through the flame quickly so that you get the heat without burning it.
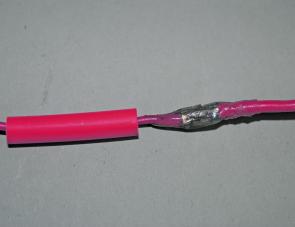
MacdTech0115_11
When completed, the heat shrink will constrict tightly around the wire and crimped connection, and a little glue will have been squeezed out each end to create a totally waterproof wiring connection which will last an extremely long time.
Reads: 4289