One of the great things about fly tying is the variety of materials available that can be used to produce various patterns. Not only are they available from specialist flyfishing outlets but your local craft shops also have a broad array of materials that can be used.
This month’s pattern is one I tied years ago after inspiration from a book entitled Tying Glass Bead Flies by Joe Warren. The Beadworm is a basic, durable and easy to tie pattern that will heighten your awareness of using beads for tying flies. It is a likely candidate to use on any species that likes to eat worms and I have used it successfully to catch silver perch, whiting, bream and pike over the years.
Tying with beads is fairly simple. The only basic principle is that the bead has to have a large enough hole so that it will thread onto the various hook patterns you wish to use. Some hooks are better for this than others as they have smaller barbs that allow a larger array of beads to be threaded onto them.
Stinger pattern hooks, such as Gamakatsu B10S, Mustad C52S BLN and Tiemco 8089, all have relatively small barbs and are good ones to start with. Beads are especially ideal for patterns where you desire a segmented look, such as various worms and insects.
Beads are available in a broad array of sizes, shapes and colours and can be purchased from an array of places, including craft supply shops, Spotlight stores, Crazy Clarke’s and many similar discount stores. They are reasonably cheap and you can often purchase one hundred or so beads for as little as $2. Some packets even have a variety of colours in them to provide more tying options.
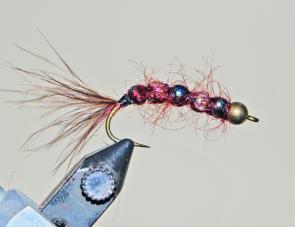
Even though they are mostly plastic beads, you will also find many glass beads as well. The colours on the glass beads seem to last longer than the finish on the plastic beads when these patterns are used in salt water. In the Beadworm, I have used a brass bead head (available at fly tying stockists) at the front of the fly as this adds weight and gives a head down action in the water. All the other beads were sourced from various craft shops.
Dubbing is short strands of fibre that can be adhered to your thread with wax and then tied into the fly. They create a very natural appearance to the fly with many short and uneven strands of fibre protruding from the body of the pattern. This creates a natural look in the water and breaks up the definitive and hard outline of the fly, making it appear more realistic to predating fish.
There are a lot of different dubbings available on the market including super possum, hares ear, scintilla, buggydub, lite brite, seals fur and antron. Some are just strands of clipped animal hair (as their name suggests) whilst others are made from synthetic materials such as antron and mylar.
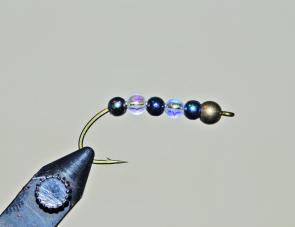
(1) Before securing your hook in the vice, you will need to add your beads. First, thread on the brass bead head, with the smallest hole facing the eye of the hook. Next add the various beads until you cover most of the length of the hook shank as shown. I have opted for alternating colours but the variations are endless. Now place the hook in the vice as shown.
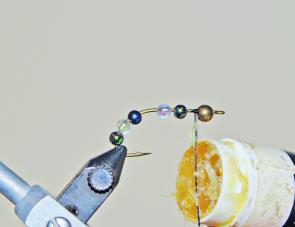
(2) Attach the thread to the shank with a jamb knot (or similar) just behind the brass bead head. Use your dubbing wax to wax about 5cm of the thread in preparation for the dubbing. You can just push the rest of the beads back along the shank out of the way to make it easier.
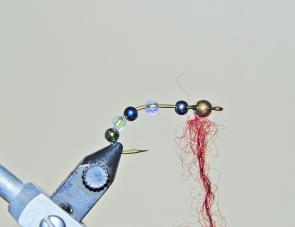
(3) Take some of the dubbing and twist it loosely around the waxed section of thread as shown. It does not have to be tightly wound as the thread will help to secure it when we wrap it. We also want plenty of errant fibres to be protruding from the finished fly.
(4) Wrap the thread and dubbing around the hook shank twice and then push the next bead up. Wrap over this bead and again do two wraps of thread and dubbing behind it.
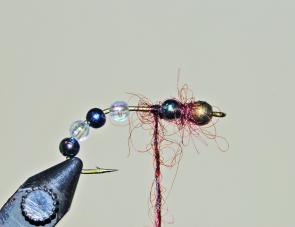
(5) Continue wrapping between and over the various beads until you get them all done. Place the hook in the vice on an angle as shown. Take a few strands of the marabou, which are around 10-15mm long, and tie in so that they face downwards as shown. This will ensure that they will still waft enticingly in the current, even when the fly is motionless on the bottom. Finish off the thread with a whip finish and cut away the remainder.
(6) Returned to a horizontal position in the vice and the Beadworm should look like this. Use your bodkin or another pointed instrument to tease out strands of Antron fibre and give the fly a hairy look. Apply a little vinyl cement to the exposed thread where you affixed the marabou tail. Your first bead fly is now ready for use. We will try a few more bead patterns in the coming months so start building up your supply of interesting beads.
Facts
MATERIALs
| HOOK: | Tiemco 8089B #10 |
|---|---|
| THREAD: | Flat waxed nylon – black |
| HEAD: | Brass Bead Head – large |
| BODY: | Plastic beads – gunmetal and clear |
| WAX: | Dubbing wax extra tacky |
| DUBBING: | Antron – claret red |
| FINISH: | Vinyl Cement |