This month we will look at a great baitfish profiled fly, which proves that great flies don’t have to be difficult to tie. The Queenie Killer is an extremely simple, yet very productive fly that has caught just about everything I have thrown it at in both fresh- and saltwater.
Although I prefer to tie this pattern in small sizes to imitate the juvenile baitfish on which many species feed, it can also be tied in larger sizes to match a broad array of baitfish profiles.
The Queenie Killer is a fly I developed more than a decade ago. In fact, it was featured in my first ever article for QFM back in February 1998. The topic of that article was catching the numerous small queenfish, which used to be so plentiful in the Gold Coast Seaway before the commercial sector found a market for them.
These fish were not the giant leatherskin queenfish of tropical waters but the lesser-known barbed-wire queenfish. This species (Scomberoides lysan) are a genetically smaller species of queenfish that rarely exceed 50cm and only weigh a few hundred grams. But what they lack in size they make up for in tenacity, being a willing taker of small flies and a lot of fun on fly rods up to 5wt.
Whilst the Queenie Killer was initially developed to target these seaway inhabitants, it was soon to prove a valuable pattern for most species that eat small baitfish. This includes trevally, tailor, tarpon, tuna, mackerel, bonito, bass, saratoga, herrings, pike and even the rare deepwater flutemouth, just to name a few.
Fishing light tippets to 2kg are required to get hook ups on queenfish at times, however, I have had my fair share of bust ups. Queenfish can often run hard or engulf entire flies, leaving the leader exposed on their small and sharp teeth. I would sometimes go through more than a dozen flies per trip, so it was lucky that the Queenie Killer was such an easy pattern to tie.
Fly tying materials were fairly limited in Southern Queensland when I first started tying this pattern. For the body I used a Tiewell product called Mara-wool, which was combed and straightened sheep fleece. This worked well then, and still does, but easier to tie source materials such as polar fibre are now preferred.
The synthetic dubbing materials used are simply thin shredded strands of Mylar tinsel. It has various names from different suppliers, for example, Spirit River call it Lite-Brite and Tiewell call it Micro-Brite. There are several great finishes but I prefer Tiewell’s UV pearl, which has a purple highlight because it provides that lit up baitfish look to the fly. The bellyshine and pearl also work well in this pattern.
Any basic O’Shaunnessy pattern hook will suffice, however, you could tie the Queenie Killer onto a long shank hook if you wanted the hook point closer to the tail to avoid short takes.
Initially, I tied this pattern using 1kg Platypus Pretest monofilament as thread but now you can buy special monofilament thread for fly tying. Fine mono-thread is important for two aspects of this pattern. Firstly, it allows you to tie down the Micro-Brite without being obvious in the finished fly. Secondly, it allows the eye to be tied on securely yet the thread becomes almost invisible once the epoxy is added, which leaves the eye a prominent feature. This is important because the eye is the key focal point when a predatory fish lines up and attacks its prey.
The stripping techniques I use for this fly has two speeds, flat out or stop. When the pelagic fish are smashing and slashing their way to gluttony on balled up baitfish then a cast far and strip quick technique will usually provide a good catalyst for a strike. The predatory response of not allowing a single baitfish to escape from the bait ball will usually prompt the fish into engulfing what it sees as a fleeing baitfish. If you are getting follows and no takes, then you are not stripping fast enough. Tuck your rod under your arm and employ a double-handed strip to get maximum speed. You will never be able to strip too fast.
Sometimes the feeding pattern is a lot more sedate, especially when longtail tuna are concerned. Often they will just cruise around sipping down the almost totally transparent bait.
Another situation occurs when you have a pelagic species demolishing the baitfish close to the surface and have other pelagics, and sometimes demersal species, cruising around beneath the bait ball casually eating any wounded bait fish sinking below the melee. In these situations, you can cast out the Queenie Killer on an intermediate line and just allow it to sink. It will often be slurped up, requiring no effort from you at all except to strike and set the hook.
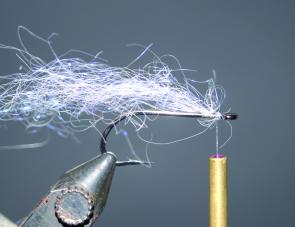
(1) Place the hook securely in the vice and attach the thread with a jamb knot (or similar) just behind the eye of the hook. Tease out a small amount of the Micro-Brite and tie it on at this position.
(2) Wrap the Micro-Brite around the hook shank and hold the last piece as shown. This portion will become the tail section.
(3) Keep holding this section whilst you use your other hand to wind the thread down along the hook shank over the Micro-Brite and then back again to the starting position. The tail section should remain it position once you let go.
Whip finish at this point but do not cut away the remaining thread. Take the hooked side of some Velcro and rub it over the Micro-Brite to create a fairly scruffy look and release any tied down fibres.
(4) Get a very small portion of white polar-fibre. no longer than twice the length of the hook shank. Tie it in just behind the eye of the hook.
(5) Next get about half this amount of olive polar-fibre of a similar length and tie it in on top of the white. Build up the head with thread into a small ball as shown.
(6) Take your adhesive eye and stick one to the centre of the head on each side. Wrap the mono thread over these eyes to securely and neatly tie them down. Whip finish and cut away the remaining thread. Mix up a small amount of epoxy (a match head size portion each of resin and hardener will suffice) and then coat the entire head, eye and neck of the fly as shown. The eye will now be highly visible beneath the thread.
You will need to keep rotating the fly by hand or on an epoxy rotator as the epoxy dries to avoid it sagging to one side. Once dry, the Queenie Killer is now complete – Simple, yet deadly.
FACT BOX 1
MATERIALS
| HOOK: | Size #4 O’Shaunnessy pattern |
|---|---|
| THREAD: | Fine mono |
| BELLY: | Micro-Brite UV pearl |
| BODY: | Polar-fibre white |
| BACK: | Polar-fibre olive |
| EYE: | Self-adhesive 2mm Glo-in-dark |
| FINISH: | Devcon 5 minute epoxy |