It's certainly that time of year again – time to don some warm clothing to keep the early morning chill out as you launch the boat while the sun peeks over the hills. Bass are schooling nicely in the major impoundments. While water levels are down from last year, the fish are still there and being more confined makes them even easier to catch.
A boat is necessary for flyfishing and the trick is to move about the impoundment and watch the sounder for signs of fish. Blobs, arches, lines: these are signs of bass either schooling up or feeding on the edge of a flat where it's dropping off into much deeper water. Unfortunately, finding fish won't necessarily bring success, but there are a few tricks that should help get you hooked up.
Your tackle set-up is very important when it comes to catching deep-water bass. Six to eight weight outfits are ideal, but to get the fly down to the fish a fast sinking fly line matched with a leader that sinks at about the same rate as the fly line is essential.
A Striper IV line will get the fly down but simply tying a bit of leader material to the end of the fly line is not going to see bass hooked. The leader plays a very big part in keeping close contact between the fly and the angler. Even connecting a store-bought standard tapered leader to the fly line is going to restrict your chance of success as the long taper seems to stop the fly from sinking at the same rate as the fly line, which causes a belly to develop between the fly and fly line when you make short sharp strips.
The ideal material to use is a 6kg twisted leader, preferably one made from fluorocarbon. While some tackle stores sell twisted leaders in breaking strains suited to this style of fishing, a lot of them don't. Most anglers simply make their own. In this article I will describe how to make a leader that will be effective on deep bass.
I asked JB from Captain Bligh’s Tackle World at Slacks Creek to help out with the photos here as he’s a dab hand at this business – he's probably made more twisted leaders than I’ve had hot breakfasts!
Please note that lightweight fluorocarbon (around 6kg breaking strain) would normally be used for a leader, but to make sure that the photos were a success we opted to use 8kg yellow Stren.
Step 1: Cut off around 4.5m of line from the roll. Next you need to work out how much to allow for the tippet section to which the fly will be tied – around a metre is usually fine. That leaves 3.5m to play with. With the tippet excluded, the idea is to then double over the remainder. In effect, you will have a doubled over length of fluoro with one bit a metre longer.
Step 2: Next, start the twist routine. As John pointed out, it’s very important at this point to use thumbs and forefingers from each hand twisting in onedirection only, in order to get the twist going evenly and closely. It might help to slightly dampen your fingers to get the twists happening nice and tight.
Step 3: Keep twisting in even movements until it becomes hard to go any further. John says that from time to time it will be necessary to make sure the separate bits of leader material are not tangling. This occurs because there is a lot of twist being imparted at the top and keeping the two ends well separated will prevent them tangling. One bit on each side of the body is the way to go, but as the leader progresses it does get a bit easier to keep them apart.
Step 4: The first bit is twisted nicely, leaving just a short tag in one hand and the long tippet in the next. Tie a two-turn surgeon’s loop into the end of the twisted section. Make sure that it is tight and that the short bit of tag is trimmed neatly off at the knot. This will create a twisted double section plus a tippet.
Step 5: Take the newly twisted section and double it over before re-starting the twisting process. To get the proportions correct, double it so that around half of the two-turn piece just created is being worked on with the fingers to impart twist, while the other half (which is connected to the tippet) is hanging slack. This section won’t be any harder to twist than the original piece and because all sections are shorter it is less likely to get tangled.
Once there is no more line to twist up and just a short tag of the two-turn bit remaining, make another two-turn surgeon’s loop and cut the tag off. Your leader is now finished and ready to be connected to a loop whipped into the end of the fly line.
In the end, you should have: a four-strand twisted section to which the fly line is connected; a two-turn twisted mid section around the same length as the former section; and a final single strand tippet to which the fly is attached.
Once you have created a few leaders, you can experiment with lengths. In my experience, varying the proportions of the first two sections can slightly improve casting performance, but the basic leader described in this article (which is ideal for a beginner to start with) will turn over a weighted Vampire or Clouser with ease. Most importantly, the line is rigid enough to keep the fly from sagging down and away from the fly line during the retrieve. This avoids missed hook-ups when you can’t feel the bite properly.
| So that's the home-grown version of the twisted leader. While it may seem a little involved on paper, it’s actually | not that difficult to make. Give it a go as the rewards are worth it. Next month we’ll look at how to use the twisted leader for best results on the water. |
|---|
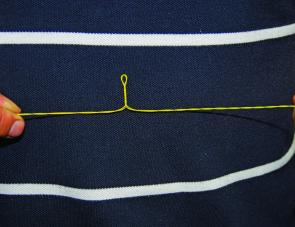
The surgeon's loop is an ideal knot for tying in each twisted section as it is completed.
Notice the twists going into the line nicely.
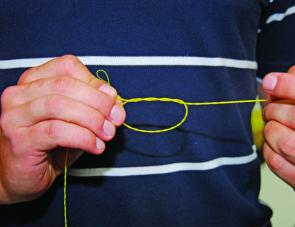
The doubled up two-strand section is being twisted into a four-strand section.
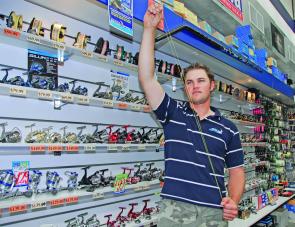
John holds up the doubled material before starting the twisting process. Note that the tippet protrudes below his hand.


