With the reefies starting to come on hard and winter about to arrive I want to share one of my rigs with you all. Traditionally, options such as floaters, snell, gang and other rigs can be used to catch fish depending on where you are fishing but this rig is perfect for bottom bashing. It has proven to be very successful version of a paternoster rig that I use and has caught everything from tuna and pearl perch to massive snapper and cod. Your hook-up rate will increase dramatically when compared to anglers using the traditional versions. Now, I have used this with both two and three hook versions but I suggest sticking to a two hook rig because of the drag and other difficulties a three hook rig can create.
So let’s step you through the making process and show you why this rig will catch more fish.
2 x 4,5 or 6/0 hooks (I use Gamakatsu Octopus)
1m of 20–30kg leader
Beads and fluoro tubing (if required)
1 x swivel rated to same as line capacity
Thread your hook and bead/tubing onto the line and make your first loop. The drop on the line should be around 15-20cm.
This is one of the main differences over other versions where you would make the loop without the hook and then feed the hook on later.
Part both lines and then twist the line on itself 5-6 times. Open the centre hole created by the twists.
Feed the hook and the bead/tubing through the hole and pull the lot through.
Keep the tension on the hook end and moisten the twist area and pull together forming a tight knot.
Now here is the twist. With the hook already on the line you will notice that it is moving more freely than feeding the line through the eye and pulling back over the hook (Figure A). To give the hook total control and freedom tie another simple loop knot no more than 1cm above the eye of the hook. Pull it tight ensuring that any beads or tubing stay above the knot. You could use a crimp instead of the knot but I have never had a rig that has broken in that spot. With the hook free to move it also creates less tension and friction on the line and there is virtually no wear on the line that goes through the hook eye. A big difference!
You will notice that the hook can move in any direction and has total freedom unlike the method in Figure A. You then do the same process over again making another rig the same down the line far enough not to tangle. The two hooks should not cross over or touch once the rig is made thus avoiding tangles.
Now we tie a simple knot to thread through the sinker and swivel and the job is done.
The only difference when using this rig is that you can not interchange hooks. To overcome this issue I make a few of each using different size hooks and select the rig to match the fishing. Give this a go next time and watch your hook-up rate improve.
Reads: 6649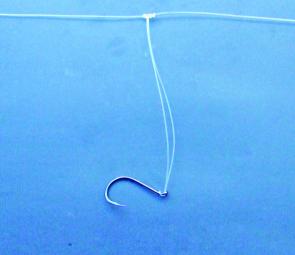
Figure A - With the hook already on the line you will notice that it is moving more freely than feeding the line through the eye and pulling back over the hook
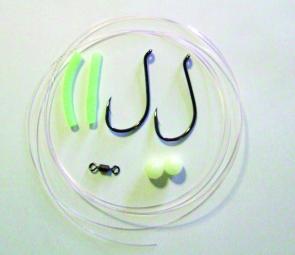
All of the equipment you will need: hooks, fluoro tubing, beads, leader and a swivel.


