A paternoster rig has a sinker on the bottom (on the sinker loop) and either one or more ‘droppers’ above the sinker. Most rigs will use two droppers that stand out from the main line.
Last edition we covered the option of a standard dropper loop for a paternoster rig’s hook loop; this month we tie the hook loop using a knot called the twisted dropper knot or loop.
Twisted droppers loops are stiffer and can help the hook hang away from the main line. Having the knot sticking out from the mainline reduces the tendency for your hooks to tangle around the mainline. Both the dropper knot (see last month’s QFM) and the twisted dropper have a breaking strain of up to around 80% of the main line.
• Droppers should be spaced apart so that they do not overlap; and so that the hooks (including gangs) do not overlap either.
• Individual droppers should be at least longer than the largest hook that you wish to use.
• When drifting, I like one of my droppers to be short (around 15cm) and the other about 30cm long. Sometimes I’ll go much longer to 60cm for times such as when I’m at anchor.
• If your droppers are 12-15cm long, then they should be at least 50cm apart – that’s with one single 5/0 chemically sharpened hook on the bottom and a two-hook gang rig on the top dropper.
For further discussion and information on this knot and the paternoster rig, please see my articles on these subjects on the QFM website.
STEPS
Step 1
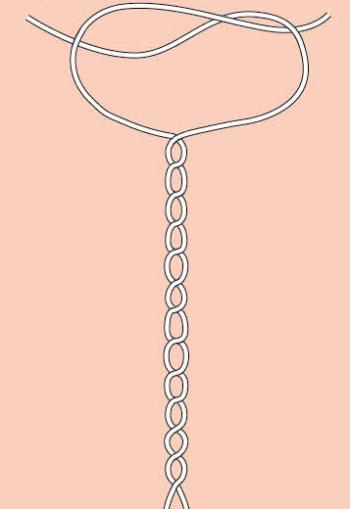
Hold the trace, between thumb and forefinger, either side of the location along the trace where you want the knot to be tied. Then twist the trace, to form loops in the middle between your hands, by spinning both sides in opposite directions with the thumbs and forefingers. This forms tight loops for your dropper.
Step 2
Spin the twists into about ten loops for a short dropper (about 20 twists for a long dropper).
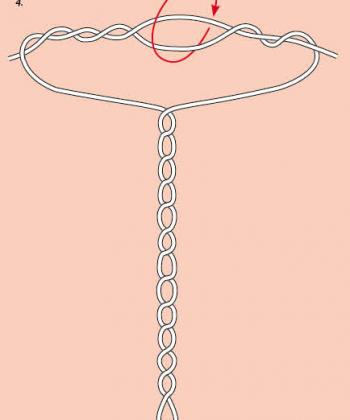
Step 3
Cross over the two sides of the main line and twist one around the other. The rest is now the same as tying the standard dropper loop. That is; after forming a loop in the line (do not tie a loop, just form a loop), then insert a finger into one side of the crossover.
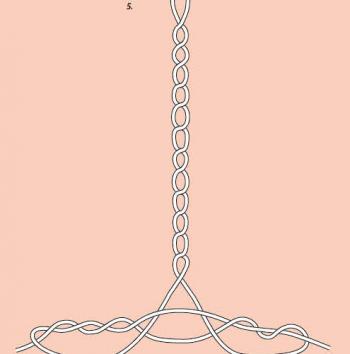
Step 4
Pull one side of the loop/crossover down and start twisting/wrapping it around the standing line. Keep the centre ‘hole’ open (with your fingers). An alternative is to twist from/around the centre, wrapping an even number of turns of each side of the centre opening. Have a go and see what works best for you and your dexterity.
Step 5
Having completed between four to eight half-twists, pass the twisted loop through the cross-over ‘hole’ that you were rotating with your fingers. Pull the twisted hook loop all the way through.
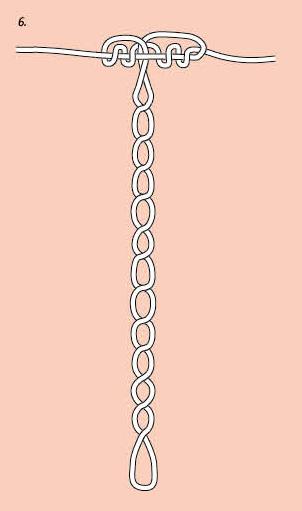
Step 6
Pull the mainline, the standing ends of the mainline one on each side of the knot, apart (away from the knot) in order to tighten the knot about half way. While pulling the knot ‘half-snug’ you can hold the twisted loop lightly with your mouth... ensure that you don’t pull the knot snug just yet!
Step 7
Then moisten the knot and snug the knot up tightly.
Reads: 11519