It was the mid 1990s when I first installed a depth sounder on my fishing kayak. It was an old Eagle grey scale and you could probably count the pixels on your fingers and toes, so it looked like a game of Tetris. It certainly didn’t have any sort of down, side or 360 degree scanning or imaging. What it did do though, was allow me to see how deep the water was, so that I could focus my casts along the edges of dropoffs and banks.
In those early years of kayak fishing, I was fishing from a 9’ sit inside kayak, and after some research and discussion with boaties that had sounders, I decided to Sikaflex the transducer inside the hull so that there was no air between the transducer, the hull and the water. This allowed the sounder to shoot and receive the signal through the hull. This served me well for many years and when it finally separated a little and was reading off and on, I just threw a handful of water in around the transducer and away we went again.
So let’s have a look at why you might add a sounder to your kayak, some things to keep in mind when selecting a sounder, and a few options when it comes to installation.
I remember Tim ‘The Bream’ Morgan saying a sounder is your eyes beneath the surface, allowing you to locate structure, bait and even fish. This is spot on. When you look out over an impoundment, across a river, or over an expanse of ocean, especially at a new location, it can be quite overwhelming in terms of where to start. For many years it took time on the water to work areas out. If you snagged a few lures, you’d found some structure. If you kept catching weed, you knew the area was weedy. A clean lure generally signalled a sand or mud bottom. Low tide explorations added to your bank of knowledge and understanding of the system, and over time you cracked a pattern in terms of tides, moons, water clarity and other variables.
With the aid of a sounder you now launched onto this new waterway with your eyes scanning the horizon for obvious structure, while they also referred to the sounder in search of snag piles, holes, banks, dropoffs, bait, fish and other keys to the puzzle. This ability to see below the water can be even more important when fishing from a kayak, as we tend to focus our attention in a smaller area, rather than travelling the distances covered by the boaties in search of fish. A sounder fast tracks your knowledge and allows you to get the most out what you are able to cover.
Select a reputable brand and buy the best you can afford. That’s a good starting point. You don’t need to blow the budget though, with Lowrance now offering a colour sounder for under $150 specifically designed with kayak anglers in mind. For those heading offshore, fishing tournaments, or who have the budget, a more powerful unit with more features and a larger screen provides additional information, detail, and is easier to read, but you do need to consider the available cockpit space and mounting options.
After my early ‘Tetris’ days, there are now a couple of features that I always opt for when purchasing a sounder.
A colour sounder allows you to better separate fish from structure and bait, identify bottom types, and also to separate fish from thermoclines. I remember well the first time I used a colour sounder; I located a ball of bait that on my grey scale sounder would have appeared as a dark coloured ball. Low and behold, with my colour sounder it was a green ball, with 2 red arches in amongst it. After catching a few yellowtail pike, I would normally have moved on, but I persisted and soon hooked up to 1 of the red arches, which turned out to be a nice snapper. Returning to the bait ball, it wasn’t long before the rod buckled over again and I was into another red. When I returned to the mark once more, I found a green ball on the sounder with no red arches. I was sold!
If you can afford a combo sounder/GPS unit, then there are many benefits available. Once you locate fish-holding structure, a GPS allows you to mark this point (waypoint) and easily return to it in the future. It also allows you to mark bait or fish, a point where you had a bite or hooked a fish, or anything else of interest. If you are drifting or trolling, you can also record tracks that show where you have been to ensure you are covering new water on your next run.
A GPS is also handy when you are on an adventure from Point A to Point B, allowing you to assess the distance covered and ensure you are on track. This becomes even handier when on multi-day adventures where you need to reach your designated campsite before nightfall.
When it comes to selecting a sounder, do your research, make note of what features are important to you, and talk to the experts at the local dealership.
A few years ago I decided at short notice to fish an ABT bass comp at Clarrie Hall Dam. I uninstalled my sounder from my offshore kayak, threw it in a bag and we set off. When we arrived to fish the comp, I filled a plastic Ziploc bag with water, dropped the transducer in, taped the bag closed around the transducer cord and sat it on the floor of the sit-in kayak. It read perfectly well through the hull of the kayak! Thanks to the sounder, I located bass holding within the weed and extracted them using soft plastics, weighing in my 2 fish bag, but unfortunately not big enough to trouble the winners.
What this shows though, is that it is simple science that ensures your sounder will work. As long as there is no air between the transducer and the water, then there is a good chance your sounder should read okay.
Many Hobie Kayaks now feature the Lowrance Ready System, including a built-in transducer mount and pre-installed through-hull cable plugs, so installation is a breeze. Other brands, such as Ocean Kayak offer models that feature a transducer scupper to make installation easier, while Viking have introduced a removable Tackle Pod that makes for simpler installation and the ability to remove the pod, including tackle, sounder, battery and other accessories at the end of the session.
The days of using Sikaflex or silicone to attach your transducer inside the hull of the kayak are probably gone, unless you plan to only use the sounder in that kayak and not switch between kayaks or other vessels. Another option is a kit available from your local kayak or marine dealer that includes a foam block to fit your transducer to. This is glued inside the kayak hull and the transducer simply pushes into this block, allowing it to be easily removed as required. Some kits include oil that is poured into the block prior to the transducer being inserted, while others simply utilise a handful of water to remove the air between the transducer and hull.
Another common installation option is an arm on which the transducer is mounted, that in turn mounts to the kayak. This enables the transducer to be lifted or lowered as required and easily removed when not in use or when transferring the unit to another vessel. Ram and Railblaza would have to be the 2 most popular mount and accessory companies for paddlers, and they offer a multitude of installation solutions.
Fitting out your kayak is part of the fun of kayak fishing and although you don’t necessarily need a sounder to catch fish, you will be surprised just how handy it is, how often you refer to it, how quickly you learn about the area you’re fishing, and how often in the past you have most likely paddled over structure, bait, and fish. A sounder will open your eyes… beneath the surface.
WilmSound0515_1
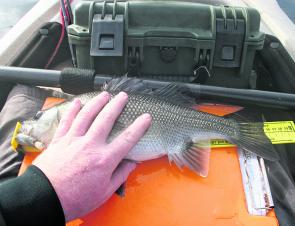
A Clarrie Hall bass on the measure thanks to the colour sounder.
WilmSound0515_2
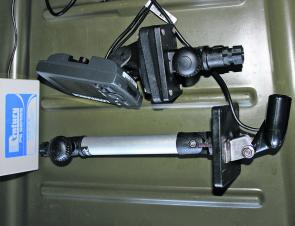
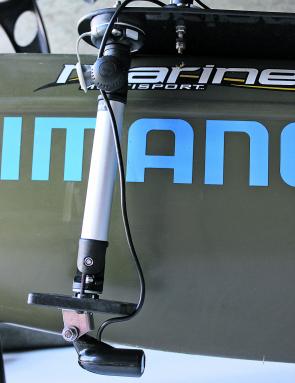
A Railblaza camera boom allows the transducer to be folded up when not in use.
WilmSound0515_3
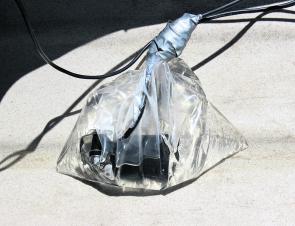
A Railblaza mount for the head unit, and a plastic bag of water for the transducer.
WilmSound0515_4
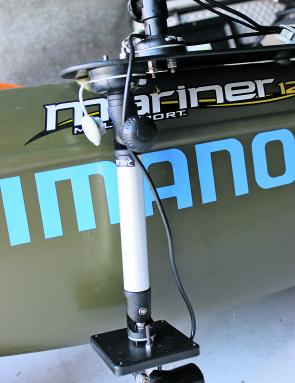
A Railblaza StarPort and adjustable platform make for a quick install and easy adjustment.
WilmSound0515_5
A small sealed battery is all that’s required to run the most basic sounder.
WilmSound0515_6
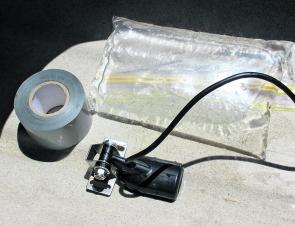
A Ziploc bag of water and a roll of tape can get you out of trouble.
WilmSound0515_7
A Railblaza boom folded down so the transducer is in the water and reading.
WilmSound0515_8
A Railblaza boom folded down so the transducer is in the water and reading.
WilmSound0515_9
A Railblaza boom folded down so the transducer is in the water and reading.
WilmSound0515_10
A Railblaza boom folded down so the transducer is in the water and reading.
WilmSound0515_11
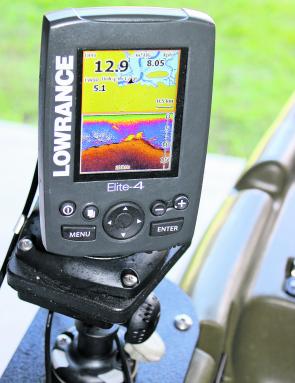
The colour sounder clearly showed bass hiding in the weed.
WilmSound0515_12
The complete assembly is attached in seconds via 2 Railblaza StarPort mounts.
WilmSound0515_13
The Ziploc bag transducer housing. Not pretty, but it’s served the author well.
WilmSound0515_14
The Ziploc bag transducer housing. Not pretty, but it’s served the author well.
WilmSound0515_15
This compact unit offers the kayak angler both sounder and GPS at a reasonable price.
WilmSound0515_16
Unlock 2 Railblaza StarPort mounts and the whole assembly is removed in seconds.
Reads: 3223