As folklore has it, this knot gained its popularity amongst anglers fishing on the long range boats out of San Diego where the knot is used to tie leaders to the large ring eyelet that is at the top of ‘iron’ jigs that are cast for tuna and wahoo.
On my boats, I’ve developed a passion for using this knot to tie doubled heavy tackle main lines (including 37kg and 60kg) to swivels and\or snap swivels. The San Diego knot is one of the few knots that will work just as well with stiff fluorocarbon as it does with flexible braid. Of course it also works well with mono type nylons. Like the similar but different Uni knot and the various clinch knots, the San Diego slides along the line to tighten.
I’ve seen tests where the San Diego is the highest rated terminal ‘slide’ knot at 94%. This is in contrast to the best of the loop knots that typically get up to 89% performance. The San Diego knot is built with wraps around both the tag end (free end) and the standing line (main line), hence this knot has a better cushion and is stronger than clinch knots. Clinch knots generally only wrap one strand.
The knot has a few names including the San Diego Jam and the X-turn San Diego, ‘X’ being the number of turns chosen by the crew to go with the system that they are using – 6-turn and 7-turn San Diegos being probably the most common.
The main trick with the San Diego is to keep control of the ‘turns’ and the end loop and the tying eye. This will require practice; each hand will have two tasks (maybe three tasks) at the same time but it is not difficult.
The San Diego can be tied in either a single line or your double – naturally when tying it in a double with stiff line you’ll need a lot of practice in order to keep it streamlined. Possibly a second set of hands will help as well. The secret is in pinching the ‘lines’ together and holding them with two fingers while you wrap with your other fingers.
If the twists or wraps overlap each other, then the knot will not pull down smoothly and it can bunch up. This may give a loose loop that can burn when it goes from almost tight to tight. The burn can cause the knot to break. To reduce friction and to avoid the wraps crossing over, work the wraps down the line. Go slow and ensure that the twists are lined up neatly next to each other and that they lay side by side (like a bind).
It is a must to wet (aka moisten) the line’s surfaces before snugging. This reduces line-weakening friction and also allows the knot to snug down better. Most anglers do this with spittle from their mouth.
To snug the knot, firmly apply pressure to clamp the wraps while slowly pulling on both the tag end and mainline simultaneously until the knot feels snug. Make sure your knot is neat and properly secured to the eye of the hook, swivel or lure.
This is different to making the knot ‘snug’ because a knot peg is not used. Once you have the knot snugged down, grab your lure or hook or swivel and secure it (to a knot peg) and slowly tension the mainline until you are confident that the knot is secure. When using flexible main lines you may take a wrap in the mainline with your hand in order to pull tight; however with stiff mainlines taking a wrap may distort the line – choose your technique based on the components in your system.
Now that we have the background – let’s tie the knot!
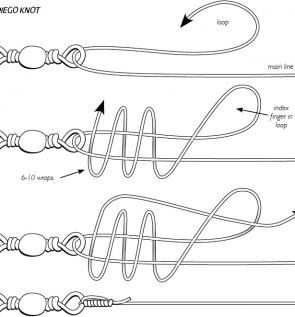
1. Pass the free end of the line through the eye to which you wish to tie. I typically tie to a swivel (I often crimp a heavy leader to the hook, this leader is then crimped to the swivel). Pinch the swivel between your little finger and the palm of the hand that is holding the swivel. This leaves your thumb and remaining fingers free. Double the line back by laying the tag end back along the main line (aka standing line).
Some anglers recommend looping the line through the tying eye twice, especially when using thin diameter lines including braid.
2. Pinch the two lines together above the tying eyelet if you can. The index finger on the hand holding the swivel can be ideal for this. Now loop the free end over your index finger (the index finger on your other hand) and using the pointer finger and thumb of the hand holding the swivel (or alternatively try using the thumb and forefinger of the hand holding the loop), make 6 or 7 wraps around the two lines. The wraps should be bound towards the tying eye. With braid you may do up to ten wraps.
3. Feed the tag end between the two lines just above the tying eyelet (between the tying eyelet and the last wrap). Then bring the free end back to the loop that is around your index finger. Complete this step by pushing the free end through the index finger loop. You should have had enough length in your free end to have not had to pull on it to snug at any stage. Now remove your index finger from the loop.
4. Lubricate the knot by moistening the lines and snug the knot using the tricks given above in the handy hints. Make sure that the spirals don’t cross over. You can pull the loop to tighten the wraps and pull the tag and mainline together to tighten the knot against the eyelet.
Reads: 2853