Once you’ve owned and used a high lift jack for a number of years, you will regard it as a trusted friend – a truly versatile and useful piece of recovery equipment and one which is very much under-estimated by some and very much misunderstood by others.
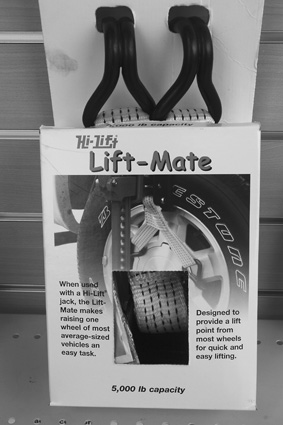
Sadly, many modern vehicles do not possess the appropriate jacking points to facilitate the use of a high lift jack – although it is not uncommon seeing a proud off-roader driving his new vehicle down the road with a high lift jack attached to the roof rack but not a hope of using it due to the absence of jacking points. Plastic bumpers and cheap aluminium side steps hardly pass for jacking points! But even with modern vehicles restricting the use of the high lift jack, this piece of off-road equipment has become a staple and necessary piece of recovery equipment for off-roaders all over the world. This is especially the case with modern front, side and rear bars being available as after-market accessories for most 4WDs – thus providing the necessary jacking points. Companies such as ARB also provide such excellent aftermarket accessories as the Lift Mate and the Bumper Lift Kit to allow jacking off the bumper bar, bull bar and wheels.
There are a large variety of brands of high lift jacks. The most common and arguably the best (it’s been around since 1905 in the USA) is the Hi-Lift Jack marketed by ARB. This is the only all casting jack available – that is, it is made from high yield and tensile strength grades of malleable and ductile castings, and these have been used for over 100 years!
Another favourite is the Canadian Jackal, also renowned for its quality and strength. And then are a wide range of copies made in Asia in the main, including those marketed by Black Rat, Opposite Lock, TJM and so on. These replicas incorporate the same design specs and configuration but I must admit to using the genuine Hi-Lift as my preferred jack. It’s strongly constructed, has a high quality lifting mechanism free of obstructions, paint and extrusions, it has an efficient action and readily available spare parts. A Hi Lift will set you back about $150 (the price range for jacks in general is about $99 to $180).
The ARB Hi-Lift jack is also available in two lengths or heights – the standard 130cm and the larger 157cm unit. The latter is particularly useful in recoveries or situations where extra height is required.
In general, lifting capacities are the same across the ranges of brands – 3175kg. Clamping capacity is about 340kg while when used as a winch the winching capacity is approximately 2270kg.
The maximum lift height for the standard 130cm jack is about 98cm (126cm for the 157cm unit.) The jack weighs about 13kg.
All manufacturers state that their units are rigorously tested, but I have experienced failures with some cheaper brands. As these items of recovery equipment are used and applied in potentially dangerous situations, there is no substitute for quality. Do not purchase on the basis of price. This is an item of safety equipment and your personal welfare and that of your vehicle may be very much at stake.
In the case of the HI-Lift Jack, al components are randomly tested for strength prior to assembly, and once completed, every single jack is subjected to rigorous testing of the lifting mechanisms.
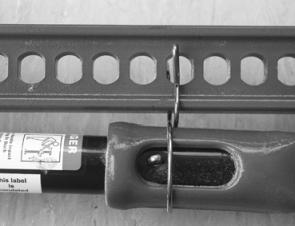
All good jacks should have both the jack specifications and instructions attached to the winch and should come with an operating manual containing clear and simple instructions on use, applications, maintenance and safety.
High lift jacks are versatile across a range of applications.
• Conventional vehicle jacking in order to change wheels and tyres.
It is surprising that most 4WD’ers regard this as the central function of the high lift jack. It is not! The reason? Because the jack lifts the vehicle by way of its chassis, so as the vehicle is lifted, the suspension and hence the wheel and tyre extends downwards until full extension is attained. Only then will the wheel lift. By this stage the vehicle is highly unstable and may be dangerous unless a substantial chassis chock is put in place – eg. a piece of log.
While the wheel and tyre can be removed for repairs using the high lift jack, never place any part of your body under the vehicle. Expedite the job as quickly and efficiently as possible and have someone observe the vehicle for any movement. Chock the wheels and if possible the chassis. As a general rule, use a hydraulic or mechanical jack placed under the axle of the vehicle. These are safer and lift the chassis and suspension simultaneously (for live axle vehicles).
In the case of independent suspensioned vehicles, use the specified jacking points – however, wheel articulation cannot be avoided with this type of suspension.
• As a recovery jack to lift the vehicle out of, or over obstructions. This is the most common off-road application. In this case the vehicle may be hung up on a log or fallen tree, rock or surface irregularity. Because the chassis has been lifted by the obstruction, the suspension may “hang” causing the wheel to lose traction, The vehicle may also have fallen into a rut or mud bog hole and once again needs to be lifted in order to clear the obstacle or material away from under the chassis or diffs, or to place timber or rocks under the wheels in order to lift it out of, or over the obstacle in order to regain traction. In the case of some vehicles, which have a spare wheel located under the rear of the vehicle, bogging in sand or mud renders the spare wheel inaccessible. The high lift jack may be used to raise the body of the vehicle in order to extract the wheel. In all these and many other anomalous situations, the high lift jack demonstrates its versatility!
• Moving vehicles sideways. In this situation, a bogged vehicle may be lifted by the jack at the front or rear of the vehicle to full jack height. The vehicle can then be rocked sideways to fall off the winch with a sideways displacement. This method if repeated, can get a vehicle onto a firmer surface to regain traction. But a warning here. Never use the jacks to the side of the vehicle if the intention is to move the vehicle sideways, otherwise the arm of the winch will dent or puncture the side of the car. Sideways displacement should always be undertaken with the front or rear jacking points of the vehicle. A vehicle can be moved forward with a jack to the side of the vehicle (or to the front of the vehicle). Rearwards displacement can be achieved with the winch to the side or the rear of the vehicle. The aim is to ensure that the arm of the jack moves AWAY from the vehicle when displacement occurs. Any alternative will result in the arm of the jack penetrating the vehicle’s body causing severe damage.
• Breaking the bead of a tyre. In this application, the wheel is placed under say the bullbar of the vehicle with the base plate of the jack on the tyre wall immediately adjacent to the rim. The jack lifting mechanism is engaged to the lifting point on the bullbar. Extending the jack will now apply downwards pressure on the tyre breaking the bead. You may have to repeat this action in order to remove the tyre.
• Clamping objects. Most (not all) high lift jacks come with a clamping component attached to the end of the arm. It usually comes configured bolted along the tip of the arm. Undo this component and re-configure it to 90 degrees to the arm. This component and the lifting mechanism of the jack now allow you to utilise the jack as a clamp – as the jack is “lifted”, the step on the lifting mechanism closes the gap between the step and the clamping component – just like a sash clamp or old style wrench – very handy for holding components together, re-aligning bent components and repairing vehicle damage caused by a collision…..and so on.
• Lifting the vehicle to expedite under-body repairs and suspension changes. To illustrate this application, I will use a recent example. The accompanying photograph illustrates the case. A vehicle had sustained front-end damage in the Snowy River Wilderness a long way away from any repair facility. In order to lift the entire vehicle to carry out repairs to the steering, suspension and axle components, two high lift jacks were used to raise the front of the vehicle which was then chocked under the chassis with two sturdy tree logs cut by chainsaw. Repairs were then undertaken with safety and with excellent access. We have used the high lift jack many times in this way to undertake repairs on vehicles, trailers and also caravans. Such front or rear end lifting can also allow the removal and re-installation of shocks and coil springs while when used in conjunction with a hydraulic jack under the axle (and appropriate chocks), the removal and re-installation of leaf springs can also be undertaken. In all these applications, the wheels should be chocked and the vehicle handbrake applied with the vehicle in gear.
Next month I’ll take you through more high lift jack applications, maintenance and storage, and give you step-by-step instructions on the best way to use it.
[CAPTIONS]
1. Hi Lift Jacks come in 130cm and 170cm lengths.
2. The ARB Bumper Lift Kit is designed for vehicles without jack lift points.
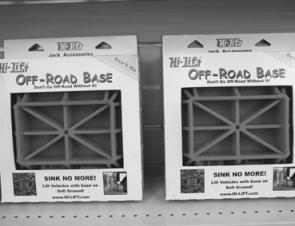
3. The ARB Off Road Base Kit is excellent for jack stability and safety.
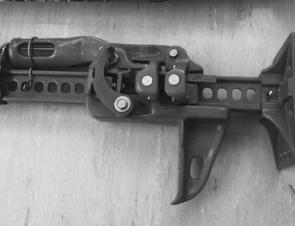
4. The Hi Lift Jack’s foot and lifting mechanism. Note the ridges on the step to step slippage.
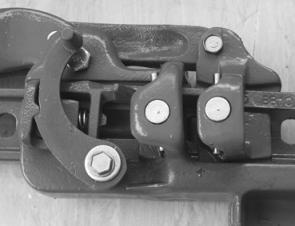
5. A close up of the lifting mechanism showing the engaging lever and pin mechanism.
6. The removable handle and handle retaining clip.
Reads: 11480