Recently in QFM we took a photographic tour of many of the accessories fitted to watercraft in order to turn them into game fishing boats. Amongst these accoutrements were photos of outriggers, and after the article was published a reader requested that we explain the basics of outriggers in more detail. In response I wrote this article to introduce the basics for both first-time downrigger users and those anglers who haven’t set one up on their own boat before.
If you don’t already know, outriggers can generate a complex debate which doesn’t serve much other than creating confusion and allowing a select few a soap-box (there are many opinions on the best way to use outriggers). In order to keep it simple let’s establish some caveats.
Firstly, let’s assume our outfits are typical Penn International style troll rods and reels loaded with 10kg line.
Secondly, we’ll focus on trolling soft skirted lures and baits (rather than other concepts such as deploying outriggers when drifting or at anchor, or towing hard-headed lures in conjunction with tag lines).
Finally, our target species can be any surface pelagic up to around 100kg in weight.
Interestingly, outriggers are not an absolute must for trolling. One of the best ways to use outriggers is to know when not to use them at all.
I have a boat that we use for prize-money game fishing where it’s all about the biggest of a species, and we hardly ever use the outriggers. Instead, we catch most of our fish by targeting specific hotspots, and big fish such as tuna over 50kg with livebait. When you know where the fish are most likely to be, it is less troublesome to just put one or two baited lines into the water. Using this approach – focusing on spots where only one boat can fit, such as around an obscure pinnacle or suspended bait ball – we’ve won a lot of tournament categories.
However, you don’t always get such defined scenarios out on the ocean so, like everybody, we have to go looking for the fish too.
On another boat set up for a different purpose, which includes trolling while looking for big fish, we use outriggers to give us a wider trolling spread when we are out covering water. Such scenarios include trolling lures at high(er) speed along current lines or along reef edges.
The basic outrigger set-up is a long pole, which can be as simple as a surf rod blank, which is mounted to the boat by an adjustable bracket. Some of these brackets have only two positions, up or down, while others have many adjustments. In most cases up and down are the only two settings that you’ll ever need.
When bolting the outrigger to the boat (making sure that you have plenty of reinforcement under the base plate on both sides of the mounting location) I recommend setting up the angles to achieve maximum width with the outrigger tips about level with the transom. Having the outrigger tips about level with the transom enables the boat driver to make turns with the least risk of the trolled fishing lines ending up at bad angles.
An outrigger or a pair of outriggers typically increases the spread of your trolling pattern. It also means that, in the simplest of set-ups, two troll lines (one per outrigger) can be towed from a greater height – one on each side of the pattern. This higher towing point can put more action into a lure and/or get your bait away from the white water behind your boat. Obviously it also creates separation between the lines when turning the boat, and reduces the risk of tangles.
Each outrigger pole will have a continuous lanyard attached to it. The lanyard runs through pulleys or eyelets at both the top and bottom of the outrigger pole, much like a flag pole. Attached into the lanyard is a release clip; typically this is a pin type release clip of the Blacks brand or one of the copies. The lanyard is pulled in (down) to bring the release clip down to the rod tip, then the main fishing line is attached to the clip, and the lanyard is then run back up the pole while is let out off the fishing reel. Once the release clip nears the end of the pole it achieves the desirable increase in trolling width and height.
The line is now towed from the clip until a fish eats your lure or bait. At that moment the clip releases the line and you are then free to hook and fight the game fish.
In some cases, particularly with soft lures and baits, you allow a small amount of slack line between the rod tip and the outrigger release. This cushion, plus the extra line caused by the ‘sides of the triangle’, is called ‘drop back’. The theory is that it is there to allow the fish to take the bait, knock the line out of the clip and then turn to face away from the boat before the line comes tight onto the rod. The ideal scenario, particularly when using a J hook, is that the hook is then pulled back into the corner of the fish’s jaw while the fish is swimming away from the boat, and you get the highest chance at a solid hook-up.
I like to see a sphere type bead, ball or similar on the lanyard above the release clip to reduce the risk of the clip catching on one of the fittings at the top of the outrigger pole and getting stuck up there. In the same vein, the rigging eyelet on the top is generally set up 30cm or so lower than the outrigger’s tip to minimise the chances of the line tangling around the tip. This issue of tangling is less of a concern at the lower end of the set-up near the mounting point because you can get usually get your hands to this location to untangle anything.
Tangles are the big issue with outriggers. When outriggers tangle, the follow-on effects can see things broken – including outriggers, mounting plates and rods, resulting in lost fish. To reduce tangles I like to mount the bottom eyelet of the lanyard’s travel at a position above or away from the tip of the rod. Locations that achieve this include the targa bar, the T-top or the flybridge.
If the release clip can run below the height of the rod tip then, when you are working the lanyard, there is likely to be a point where there is slack line between the clip and the rod tip. Slack line affords the opportunity for a tangle to occur. By their very nature troll lines tend to twist so they tangle more often and more severely than most other lines. To reduce this it is a good idea to have two people working with each other to pull in (or out) the lanyard while the other person controls either the reel or the rod and reel.
It is not uncommon to get a strike while you are setting the line in the clip and running it up the ‘rigger. This is the time when you least want to have a tangle, so eliminating slack line as well as having two people setting the bait will reduce the risk.
Release clips are typically set up to release the line when the slightest increase in pressure occurs from a fish. For sure you don’t want to set the clip tension so high that the line is at risk of breaking.
And that’s as simple as it can be! Try to not let it get too complicated; there’s no need.
Reads: 26063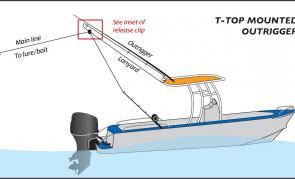
This is a good layout of the lanyard and clip and rod tip in relation to each other.

This is the simplest way to twist the main fishing line into a loop to put into the clip.
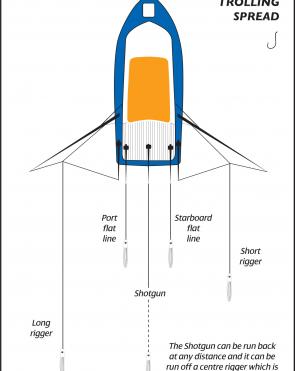
Here you can see the outriggers providing a wider trolling spread.


