Snapper are one of the most popular target species of offshore fish on the east coast and southern coast of Australia. They pull hard, are great fun to catch and extremely tasty on the plate!
There is a multitude of techniques that you can use for catching snapper and, generally speaking, the more of them there are in an area, and the less pressured the fishery is, the easier they are to catch.
Your standard bottom bouncing rig will get you amongst a few snapper basically wherever you are fishing; however, as you get into areas that cop a lot more angling pressure these prized fish become harder to catch and require a lot more finesse. This is where float lining comes into its own. A good float liner will out fish several anglers fishing the bottom most days of the week. The other major plus with float lining is that the average size of the fish that you catch is generally bigger.
Let’s take a look at the basics around float lining.
This is a discussion that would have to be similar to the old Ford-Holden debate. Fishos that have been using mono for their float lining for ages will be of the opinion that it is the best and similarly anglers that use braid as their line of choice will be hard to get to try anything else.
I use braid and have had excellent results using it. So I would fall into the latter category. And I am one of those fishos that you will struggle to get to use mono simply because I am so used to fishing with braid.
The key is to use the thinnest braid you can get away with. It’s hard to go past the PE type braids due to their suppleness in the water and finer diameters. My braid of choice for float lining is Toray Radius in anything from 20lb to 40lb. It is a good quality braid and can take a relative hammering before showing signs of wear and tear. If you were to choose mono, then similarly, something with a thinner diameter for breaking strain would be a good choice; again, something around that 20-30lb range would do the job nicely.
When using braid you can run a fluorocarbon or mono leader as a link between the rig and the braid – don’t be shy on length. I would opt for a leader of around two or three times the length of my rod. This keeps the braid away from your rig and also cushions the effect of a hard running snapper or a crunching hit.
This leader material should be around the 30-40lb range depending on water clarity and the terrain you are fishing in. Shallower dirty water with a rugged bottom would mean that you should upsize your leader a bit, while deeper cleaner water with a more forgiving bottom would suggest a lighter breaking strain leader. The bigger fish are generally a bit shy when it comes to terminal tackle so the lighter you can keep your set up without jeopardizing your chances of landing a big fish the better.
The float lining rig is a very simply one in that there isn’t a lot of swivels, knots or droppers involved. In fact all you will need is a few ball sinkers in varying sizes, a few hooks that you can snood together, or alternatively a few gangs, and you are ready to fish.
Whether you use mono or braid as a mainline the basic rig stays the same. Thread your ball sinker onto the line and then simply tie on your set of three gangs in 4/0 or 5/0; alternatively, snood two 5/0 or 6/0 good quality hooks of your choice on. You can then hook on your bait and you are ready to fish.
Snapper have hard mouths and getting a good hook to penetrate and hold can be a bit tricky, it pays to use the best quality hooks. We use mostly gang hooks for our float lining and my hook of choice is the VMC in 4/0 or 5/0. A gang of three 4/0 works really well on a whole pilchard, and for the bigger baits you can upsize to the 5/0.
Similarly, with the snooded twin hooks I use a Mustad or Gamakatsu hook. These are chemically sharpened hooks and, although they can’t be used for a long period of time, at least you know when you take them out of the packet they are sharp and won’t let you down on a big fish.
You can add glow sinkers, glow beads or even glow tubing to your rig. This may well help but I prefer to keep it simple and haven’t found much of an improved bite rate when added. Once again this is a point of discussion and if you are confident in doing something and it works, why change?
As with all fishing, the fresher the bait the better your results. Any type of flesh bait will do when targeting snapper.
The modest old pilchard is my favourite when float lining and a whole pillie rigged on a set of gangs is hard to beat.
If there are a few small pickers around that are robbing your bait, then fresh fillets are a better option. Bonito fillets, butterflied or filleted slimies and yakkas or whole gar are all options; there isn’t a ‘wrong’ bait for snapper.
The most important thing when using bait is how you rig them. Whether you chose to use gangs or snood hooks the bait needs to be rigged as straight as possible. If it spins on the way down then it will not only appear unnatural but also twist your main line and make fishing very difficult.
There are two ways to float line: you can keep letting line out consistently until your bait gets to the bottom and then reel it back up and start again; or, you can let out a predetermined amount of line and then place the rod in the holder and wait for it to load up.
Both techniques have their place but if you are in the right area with fish marking up on the sounder, then your bait should not be getting to the bottom. Most snapper bites will come from about halfway to three quarters of the way down and if you have a decent sounder you will often see the fish marking up a few metres off the bottom. The deeper that you fish the higher they will hang in the water column.
Take note of how deep the fish are and try to judge how deep your bait is as it is going down. A good trick to use when you get a bite is to wind the line up on the one side of the reel for the first few turns (when using an overhead). This will give you a good indication on the next drop as to when your bait is coming into the prime bite area.
The key is to get the bait down to the area that the fish are holding with as slow and natural a fall as possible. Working out the correct weight for this is paramount and may take a few drops to get correct. The fish can be really picky and if there are a few of you on the boat it is best to start off with a variety of weights to see which is producing the goods.
Drop the bait over the side and let the line come off the spool unimpeded. The bait will sink at about a 45-60º angle depending on the amount of current and/or your rate of drift. Once the bait is about halfway down you can start to hold the line in the tips of your fingers and control its rate of decent. You want the bait to keep falling steadily but with a bit of tension in the line.
Most bites come as a crunching hit and the line is pulled sharply off the spool. When this happens you need to keep your composure and engage the reel. Whether you are fishing an overhead or a spin rod, click it into gear or flick over the bail arm and wait a second or two for the line to pull tight.
This is very important to get a good hook set, especially with monofilament as the line will have a fairly substantial belly in it and if you strike immediately when you feel the bite you won’t be putting much pressure on the fish at all.
At other times the fish can be a bit tentative and may only hold the bait. When this is the case they may drop the bait if they feel something untoward. When this happens you need to keep a very vigilant feel of your line and if you feel the weight of the fish take up the slack, then strike hard.
Once you have hooked your fish do your best to get them away from the reefy bottom as they will try to get back down and cut you off. When you get them clear, take your time and the closer the fish gets to the boat the less pressure you will need to put on them. This helps to keep the hooks in and prohibit them from falling out if they have copped some damage in the initial stages of the fight.
As soon as you get the snapper on board you need to decide whether or not you intend keeping the fish or releasing. If you are going to let it go then snap off any photos you want as quickly as possible to ensure the fish is released in good health. If you are going to keep the fish for the table, bleed it and get it on ice or in slurry. By doing this you will be ensured of a good quality fish at the end of the day. Do not leave it lying on the deck for a few hours as you will be very disappointed with it when you do decide to eat it at a later stage.
Float lining is a great way to catch snapper and the by-catch can be pretty good at times too. It may just take a bit of experimenting and time to get the knack of it, but once you do it is well worth the effort and the results will speak for themselves.
Reads: 21174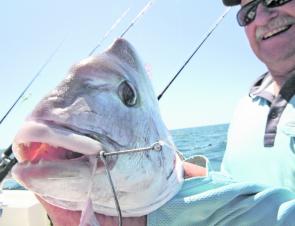
Snapper have tough jaws so it pays to use good quality hooks that you can to secure a good hook up.
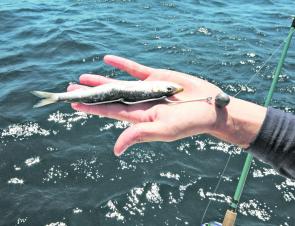
A whole pilchard rigged on a set of gangs ready to be floated.
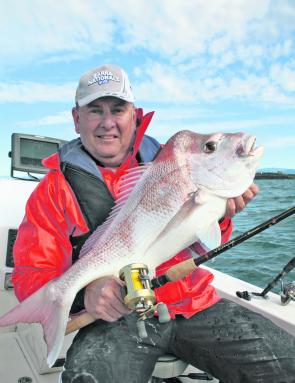
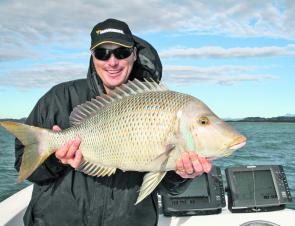
This is the quality of snapper that you can expect when float lining the right country.

Hooked up to a good-sized snapper in shallow water.
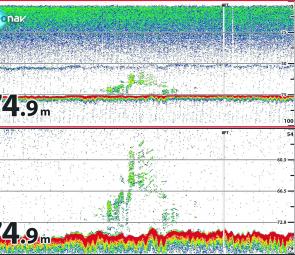
A typical school of snapper holding off a bit of rubble. These are a good float lining target especially for the larger fish that will be holding higher in the water column.
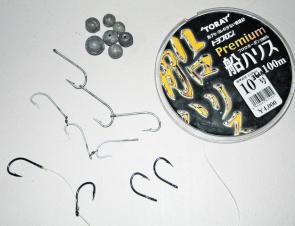
A few hooks, some gangs, a variety of ball weights and some good quality leader material is all you need for float lining.
Spangled emperor can be a great by-catch when targeting snapper in the shallower water.


