In last month’s issue I outlined what weighting in fly rods is and how this classification specifically applies to the rod’s proposed use. It all comes down to the species of fish targeted and also the size of the flies the rod has to cast.
For instance, #3 rod would be best used for smaller fish like gar, small trout or bream and for delivering quite small flies. On the other side of the coin a #8 rod would be ideal for handling fish such as big Somerset bass, saratoga and flathead and would make casting more bulky or heavier flies an easy matter.
This article will focus on the sort of tackle used when the day’s agenda involves catching fish such as mackerel, tuna, barramundi, queenfish or big trevally.
Unfortunately, like with all forms of fishing, there isn’t one rod to suit all situations. When I’ve fished at Tully the majority of 60-80cm barra encountered in nearby rivers are easily handled with a #9 rod and matching intermediate sink rate fly line. However every so often a real power house takes hold of the fly and within seconds the fish has taken refuge in a nice old nest of snags. Hindsight obviously revealed I should have used a #10 rod!
Taking the same #9 outfit to the renowned warm water barra dams such as Kinchant, Teemburra or Peter Faust can also end in frustration as the giant barra in these impoundments run to the nearest cover despite your best efforts to control them. In all of these dams there are still plenty of very large fish that demand the use of a #10 rod to subdue them. Trust me, they haven’t all gone over the wall!
On the topic of impoundment barra there’s a couple of aspects of tackle setup up that are important. Whether the fly line is an intermediate sink or a floating one, it’s best to keep the leader length under that of the rod to avoid boat side issues with the leader/fly line connection fouling the tip runner when a lively fish is at the net. This also applies to other big fish encounters, like tuna and mackerel that will quite likely make a last hard run right at the boat as the net or gaff is reaching for them.
The leader also needs to have a sacrificial section built into it so that in the event of a fish getting into cover, the fly line won’t be broken when the angler attempts to retrieve it. My barra leaders consist of 1.4m of 30kg line, 1m of 20kg, 30cm of 15kg line and 20cm of 20kg to prevent flies being scuffed off on gill-rakers. This system has saved fly lines time and again with merely the loss of the fly and short sections of leader in lieu of fly line damage. For general saltwater work I extend the 15kg section a little and then tie on a final tippet of either 10kg or 7kg, depending on species and confidence levels.
Backing is vital for heavy-duty saltwater work. A large Arbor reel should hold at least 200m of backing, in fact my Snowbees XS Large Arbor holds 300m of heavy braid. Most times it’s tucked behind the fly line, but on a recent northern trip tuna, grey mackerel and queenfish regularly exposed it to bright sunlight. With my return to south Queensland my backing probably won’t exit the tip runner for a while.
If larger fish such as high speed pelagics, queenfish, big trevally and barra are the focus a #10 outfit is likely to best suit all situations. Whether it comes down to keeping a fish from snags or maybe trying to wrestle him from the jaws of a shark, the extra power of a #10 rod comes in handy. Choice of reel comes down to available funds but again the better, longer lasting products will cost more and offer more satisfaction in the long term.
Matching fly line to the rod can be difficult, but a good start is to find one with an in-built loop on each end. More and more manufacturers are offering fly lines with loops on them which does away with the need for a Gudebrod Butt Leader loop to be attached each end of the fly line before setting it up with leader and backing. I have nothing against Gudebrod loops as connectors, but they are much less convenient than hitching straight onto the established loop.
If connecting braid backing to either a pre formed or a Gudebrod loop at the back of a fly line, be certain to connect it via a long Bimini twist formed in doubled backing initially. The ample number of braid strands will ensure a strong enough loop-to-loop connection to prevent wear during a prolonged fight.
The preformed loop at the fly line’s end can really be trusted. I have ripped leaders off them in various situations and the loop has maintained its integrity. You can’t ask for much more.
Reads: 1688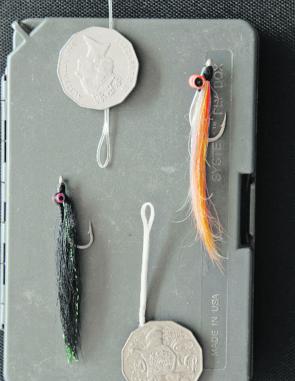
Two styles of connecting loops are shown here: the top one being a factory formed loop on a Rio intermediate sink rate line, the other being a Gudebrod loop on a Scientific Anglers floating line.
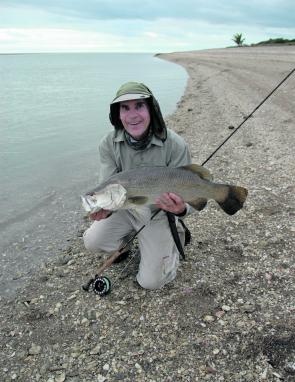
While the author’s #9 rod was strong enough to handle this barra from the beach, the same fish in snaggy territory might well prove choice of a #10 rod was wise.
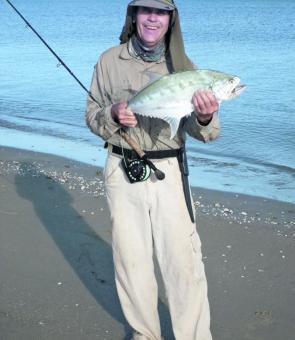
A lively queenie taken on the #9. The lighter rod may have proved the wrong choice if sharks were lurking.


