Recently several keen flyfishers have been asking about successful patterns for targeting the wily and often aggressive whiting. This species has recently been brought back into the sports fishing spotlight by anglers who were targeting them on small surface poppers but they are also a worthy fly fishing target for anglers with light rods and a stealthy approach.
Often, whiting can be sight-fished but at other times it is a case of working over likely spots until one darts in and engulfs your fly. This month’s pattern I simply call the Whiting Worm, as I initially tied and fished it while targeting this species on some shallow flats several years ago.
This lightly weighted pattern can be tied in several sizes depending on the location fished, however I mainly use a size 4 hook for the waters of Southern Queensland. While whiting can at times be exceptionally shy they also have a highly predatory and aggressive streak and will attack any possible food item with gusto. In addition, species such as bream, flathead, pike, trevally and dart have also fallen for the charms of the Whiting Worm.
One memorable session springs to mind when I was fishing towards the mouth of the Pine River, working a shallow flat between Dohles Rocks and the Hornibrook Bridge. I had caught around a dozen whiting, mainly divers but also had three nice winters stowed for dinner. The glare of the sun on the water had me erroneously casting into a very shallow area no more than a few inches deep. As I did the first strip, I saw a bow wave to my left and a hefty bream (later measured at 33cm) come charging in from around 10m away to eat the Whiting Worm. Its back was well and truly clear of the water and it was hell bent on getting this fly.
Bright colours seem to be an attractant to flats inhabitants, probably because many food items, including worms, crabs and yabbies, sport this highlight.
I mainly tie the Whiting Worm in colours such as fluoro red, scarlet red, orange, claret and occasionally rusty brown but I am sure there are plenty of other successful colours I have not tried yet. The materials list for this pattern is fairly basic and should be easily attainable.
There are also plenty of worthy substitutes that will not distract from the effectiveness of the Whiting Worm. The weight and style of the eye can be altered depending on water depth and current flow at your chosen location. I generally tie several differently weighted patterns and alternate them during a session due to the demands of tidal flow and water depth.
The hook I have chosen is a good one due to the thin gauge, extremely sharp point and small barb, which makes penetration easy. If you have trouble finding this hook pattern then try the Mustad Fine Worm hook which is a cracker.
I have used pliers to put a slight bend up towards the eye of the hook. This is so the pattern lifts during a short strip, which reduces fouling on bottom debris. It also puts the point almost in line with the eye of the hook, which promotes better hook sets.
Various chenilles, including super salt, variegated, rayon, vernille and suede could be used for slightly different effects. The ribbing material could also be altered with larva lace, minnow body material, crazy body and scooby lace being possibilities. I like the zonker fur for the tail but other possibilities could include marabou, arctic fox fur, finn raccoon or red fox fur.
Whiting are conditioned to eating food items such as minute crabs, yabbies, small prawns and tiny fish species. Due to the generally high water clarity on the flats where they hunt, whiting need to be lightning fast and aggressive.
Good stripping techniques can vary depending on locale, however I have generally found that very short strips are the best. The speed you do these with can vary from a sharp strip to a slow mending retrieve. You may find a different approach will work best in your chosen location so it pays to alter your approach on any given day.
Whiting will often follow and hit a fly several times before hooking up so continue the retrieve if it misses the hook point on the first strike. Locally, I have fished this fly in the area between Wellington Point and King Island, the flats at Nudgee Beach, the mouth of Tingalpa Creek, the mouth of the Pine River (and Hayes Inlet) and a few other shallow flats areas.
I have mostly fished these areas towards the lower stages of the tide, especially the last two hours of the falling tide and the first hour of the making tide. Some other areas may be worth investigation at other stages of the tide because whiting will venture up onto major flats towards the higher stages of the tide to take advantage of the abundance of food items.
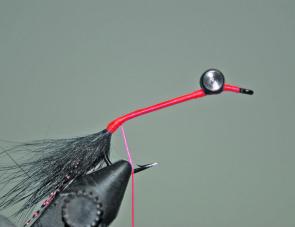
(1) Take a pair of pliers and slightly bend the last 3-4mm of the shank roughly to the angle shown. Do this slowly and gently to avoid snapping the hook. Secure the hook in the vice and attach the thread with a jamb knot. Lay down a bed of thread for around 5mm behind the eye of the hook. Secure the eyes with a series of figure-of-eight wraps just past the bend you put in the hook. Next attach the ends of three to four strands of Krystal Flash just behind the eye.
(2) Hold the strands of Krystal Flash slightly upwards as you wrap over them and advance the thread towards the bend of the hook. Finish palmering to just past the bend so the Krystal Flash now faces slightly downwards. Next cut a small portion of Zonker (rabbit) hair and tie in at this point so it also faces slightly downwards as shown.
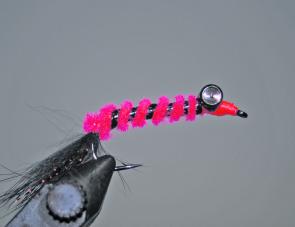
(3) Tie in the butt end of your chenille with the majority facing backwards. Next tie in the butt end of your larva lace with the majority facing forwards, as shown.
(4) Palmer the chenille forward with each wrap adjacent the last until you are up to the eye. Pass the chenille under the eye and secure just in front of the eye then whip finish, cut away the remainder and add a little vinyl cement.
(5) Next palmer the larva lace forwards with fairly even wraps right up to the fly eye. Again pass the tag end under the eye and secure just in front of it with a series of wraps. Cut away the remaining larva lace. Build up the nose cone area slightly and then whip finish, cut away the remaining thread and add a little vinyl cement.
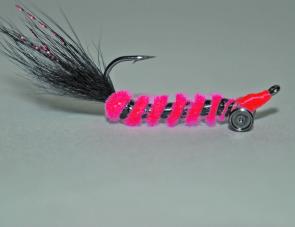
(6) The Whiting Worm is now complete and ready to catch you some whopping whiting on your favourite estuarine flat.
MATERIALS
| HOOK: | Mustad Pro-Select 3261 NPBLN size 4 |
|---|---|
| THREAD: | Flat-waxed nylon, fluoro red |
| EYE: | Real Eye, small black |
| FLASH: | Krystal Flash, red |
| TAIL: | Zonker strip, black |
| BODY: | Fluoro chenille, fluoro red |
| RIBBING: | Larva lace, black |
| FINISH: | Vinyl cement |