Well hopefully the credit cards are getting a hiding at the hardware stores as you get all the essentials to get your boat ready before summer hits, or at least dig out tools you didn’t know you had and wipe the dust off them.
I couldn’t fit everything in last month’s article, so this second part will touch on a few more important power and air tools required to get your pride and joy looking and feeling great. There are also other tools needed for repairing fibreglass cracks and chips that don’t require power and I will discuss some of those in the next issue.
Here a couple more tools essential for work on your pride and joy:
This tool is important as you will use it a lot when fixing cracks and chips. Being the brother of the diamond wheel, it has plenty of diamonds on the shaft so we can tear open the crack or chip neatly but aggressively so that the prep is done correctly. If a crack or a chip is around 2mm deep, the die grinder can rip in there and spread the crack open. Caution should be taken in this process because it spins so fast and sharp bits fly off the die. Make sure you have you’re safety gear on, especially a dust mask and goggles.
Another advantage of using the die grinder is it doesn’t leave any dirty contaminated areas around the crack or chip as the diamonds on the shaft ensure it is a nice clean shave every time. Using sandpaper will usually leave marks from the colour of the paper so I always use the die for prep. In my opinion the air-powered grinder is the best.
You can also use this tool for rounding corners with a different tip called a barrel sander. They come in different abrasions and sizes and are great for getting the right profile when sanding corners.
Lastly for this issue, but by no means the least of the essential power and air tools, is the orbital sander. It’s a tool I use all the time - whether I’m just scuffing an area that’s being prepped to glass or a patch of bog that needs to be sanded before spraying, this tool is a must have for fibreglass repairs.
The sanding discs that attach to it come separately in a range of abrasions from 40grit to 2000 micro fibre. You don’t want the sander spinning too high as it can cause hookit marks. Hookit marks are scratches caused by the velcro on the other side of the backing pad or the edge of the orbital sander. Another problem you can encounter with the orbie is over use of the sanding discs. Firstly, the discs clog up and all the grit on the disc has been used which then leaves orbie marks. Secondly, You may be sanding over unwaxed gelcoat or something like a bog that is not fully cured and this will clog up the discs leaving them unbalanced and not level. Using them like this will create craters or whoops. So changing discs regularly is important in order to get a good finish. It can be hard to justify changing over a disc when they can be around $180 or so to replace and you only have 10ft of panel to sand.
I have found a really good sanding process would be using a grit of 40,80,120,240 and then use polishing grades of 400,800,1200. Then you can move onto the buff and wax part of the job. But we will go through the polishing process more in the coming issues.
In the first three issues we have covered the fundamentals in safety gear and tools and how to use them. Be sure to take it on board; once you have an understanding of these topics, it makes starting and finishing the job correctly so much easier. In the next issue I will finish on the power and air tools and other different types of tools used specifically for fibreglass work. So bare with me and soon you will know all the ins and outs of fibreglass tools.
Reads: 4343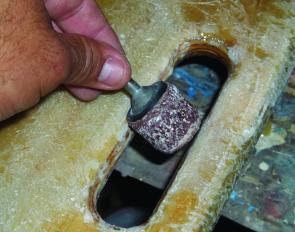
The barrel sander comes in various sizes and it has a special spot in my tool box
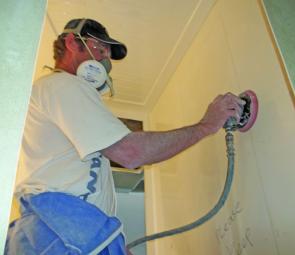
Mountie demonstrating the use of the orbital sander. What a great tool.
Ouch! That’s a nice chip – anyone know a good gelcoat detailer? The die grinder is probably the only tool for fixing a typical chip like this.


